JAMStack comments (for free) with Netlify and Fauna
- Published
- 23 August 2020
- Tagged
Note: This commenting system is now out of date. To find a more up-to-date discussion on the commenting system this blog uses, check out the series of posts starting here.
This site used to have comments through Disqus. But Disqus was a huge third-party javascript drain and resource hog, and I ditched it.
Still, comments are nice aren't they? You can build comments into netlify using forms and functions, but this works by rebuilding your website every time someone comments, which - to me - seems a bit crazy.
Thankfully, there's all kinds of people will run web-based databases for you these days. Fauna is one of them (that was featured on CSS-tricks recently). Perhaps we could store our comments in Fauna and bring them in via javascript?[1]
Looks like we're going to do this in the following manner:
- Set up FaunaDB.
- Build the bits of code to display comments on the blog.
- Build the code to allow comment submissions.
- Build the code linking Netlify's forms to FaunaDB.
Let's do this.
1. Set up FaunaDB
This is easy - go to Fauna and create a free account.
Now we're going to set up our database, including the index we need for fetching comments, and the function we'll be using for creating them.
We could do this through the GUI, but to make it as replicable as possible (and to make future work easier), we're going to set this up through a combination of the Fauna shell and a GraphQL schema. Fauna supports GraphQL as an API, which means we don't need to require external javascript libraries in our work.
Our very simple GraphQL schema looks like the following:
type Comment {
  submitter: String!
  post_slug: String!
  body: String!
}

type Query {
  commentsByPostSlug(post_slug: String!): [Comment]!
}
We're defining the Comment (which has three fields, none of which can be null) and a query to fetch comments by post slug. FaunaDB will set up the other stuff we'll need.
If we have the above code saved in a file, we can create a database that implements these collections in Fauna. To do so:
- Log in to Fauna.
- Create a new database.
- Click GraphQL in the sidebar.
- Click Override Schema and select your saved GraphQL file.
This will set up everything we need, with a couple of exceptions. We're going to deal with those exceptions now, through the Fauna shell.
Roles and permissions
The one thing the GraphQL schema doesn't do for us, is set up permissions. We can do that, however, through Fauna. The following can be entered into the Fauna shell, accessible through the Shell section of the sidebar.
Here, we're going to set up a role called "ReadComments", which is allowed to read comments (as well as looking them up through the index we defined above):
CreateRole({
  name: "ReadComments",
  privileges: [
    {
      resource: Collection("Comment"),
      actions: {read: true}
    },
    {
      resource: Index("commentsByPostSlug"),
      actions: {read: true}
    }
  ]
})
While we're at it, let's set up a role called "CreateComments", which can (as the name suggests) create comments:
CreateRole({
  name: "CreateComments",
  privileges: [
    {
      resource: Collection("Comment"),
      actions: {create: true}
    }
  ]
})
We're going to use these roles and permissions when we want either our blog, or Netlify itself, to access our database.
Right! Now we have a database, and some roles. Let's get to work building it into our blog.
2. Display the comments
The "J" in JAMstack stands for Javascript, and we've barely used any so far. But we're going to use it to pull our comments down. We're going to use Fauna's GraphQL endpoint for this - you can also do it through their own custom Fauna Query Language (or FQL), which requires their own javascript library.
First, we're going to grab an API key for reading comments. In the Fauna dashboard, click Security in the sidebar, and generate a new API key for the ReadComments role. Copy this down - we're going to use it in a bit.
Second, inside of the blog code itself, I'll add a space where my comments are going to end up:
<h2> Comments</h2>
<section class="comments-container"></section>
And now I'll write some javascript to retrieve any comments for this post. It's worth nothing that posts on my blog take the form: https://1klb.com/posts/$POST_SLUG, so I'm going to do some regexing to (a) ensure that we're on a blog post right now, and (b) work out what the post slug is actually going to be:
// CONSTANTS
let apiKey = "YOUR API KEY HERE"
let r = new RegExp("^/posts/")
let faunadbEndpoint = "https://graphql.fauna.com/graphql"

// FUNCTIONS

// Make a div with a specified class and contents
let makeDiv = function(klass, body="") {
  let d = document.createElement("div")
  d.classList.add(klass)
  d.innerHTML = body
  return(d)
}

// Make a fauna timestamp into a nicely-formatted date
let makeDate = function(ts) {
  let date = new Date(ts / 1E3)
  let months = ["Jan", "Feb", "Mar", "Apr", "May", "Jun", "Jul", "Aug", "Sep", "Oct", "Nov", "Dec"]
  return `${date.getDate()} ${months[date.getMonth()]} ${date.getFullYear()}`
}

// ACTUAL CODE

// Fetch comments for this slug
let url_path = window.location.pathname;

if (r.test(url_path)) {
  // This is a post! What is the URL for the post?
  let commentSection = document.querySelector(".comments-container")

  let post_slug = url_path.replace(r, "")

  // Make GraphQL query
  let query = {
    operationName: "PostComments",
    query: `query PostComments {commentsByPostSlug(post_slug:"${post_slug}") { data { body submitter _ts} }}`
  }

  let fetchOptions = {
    headers: { Authorization: `Bearer ${apiKey}` },
    method: "POST",
    body: JSON.stringify(query)
  }

  fetch(
    faunadbEndpoint,
    fetchOptions
  ).then(r => r.json())
  .then(r => {
    // Populate comments
    r.data.commentsByPostSlug.data.forEach(function(comment) {
      let commentElement = makeDiv("comment");

      commentElement.appendChild(makeDiv("comment-author", comment.submitter))
      commentElement.appendChild(makeDiv("comment-date", makeDate(comment._ts)))
      commentElement.appendChild(makeDiv("comment-body", comment.body))

      commentSection.appendChild(commentElement)
    })
  })
}
This seems pretty long, but to be honest most of it is either packing up the GraphQL query properly, or the formatting of the comment timestamp. With all this in place, here's how the comment looks when running this locally (you can add a record to your database manually to see if it works right):

A sample comment
So! Now, if we create a comment manually, it'll show up on the page. Kind of cool, but not too useful. Our next step will be to give users the ability to submit comments.
3. Submitting comments
We're going to allow users to submit comments through Netlify's forms feature. This basically lets you add forms to your static site, with Netlify hooking up form responses to a basic CMS on the netlify backend. We're only going to use that CMS as a staging ground - by triggering a server-side javascript function, we'll have netlify fling any comments (which pass basic spam filtering) straight on to the Fauna database itself.
You can find out more about Netlify's forms in their documentation. Netlify really makes it easy for us to use forms - all we need to do is put the appropriate tag on our form, and add the right amount of javascript to pick that up:
<form name="comment" netlify>
  <p>Leave a comment:</p>
  <p>
    <label>Name <input type="text" name="name" /></label>
  </p>
  <p>
    <label>Comment: <textarea cols="50" rows="10" name = "comment"></textarea></label>
  </p>
  <p>
    <input type="hidden" name="post_slug" value="post/slug/goes/here/" />
    <button type="submit">Send</button>
  </p>
</form>
There's a couple of things to note here:
First, we need to specify which post this comes from. We can't just fire any old comment off to Netlify, as it doesn't know where it comes from. We do it here through a hidden input - you'll have to actually auto-populate this on your blog, based on your post name.
Second, there's no fancy javascript making this work from the client end. You can't test this locally - you'll need to push this to Netlify for it to work its magic. In the background, it'll make sure your form is hooked up, and any submissions are routed through to Netlify.
Once you upload this, you'll see a comment form on your website, and you'll be able to make comments to your blog. Getting them into Fauna, however, is a different deal.
4. Hooking it up
At this point, we have:
- A FaunaDB database, ready to accept our comments.
- Code on our blog to fetch comments from Netlify onto our blog.
- An HTML form which will submit data to Netlify.
The final thing is to ensure comments flow into Netlify. To do so, we're going to use Netlify's server-side functions. Functions are basically little snippets of javascript which fire off at certain triggers - including, handily, having filled out a form. In this case, a user having submitted a form is called submission-created: when the user submits a form, Netlify will look for the submission-created function and, if it exists, fire it off.
On the Fauna end
There is very little we have to do here: Fauna will automatically set up a createComment mutation, which will take a comment as an input. What we do need to do, however, is grab a new API key - this time for your CreateComments role. This is the role we'll use to write comments to the database. Follow the same procedure as above, but this time pick the other role.
On the Netlify side
In order to set up functions with Netlify, you'll need to specify a folder in your project where functions are stored. You need to tell Netlify this by selecting Settings > Functions on your Netlify page, and telling it where to find them:
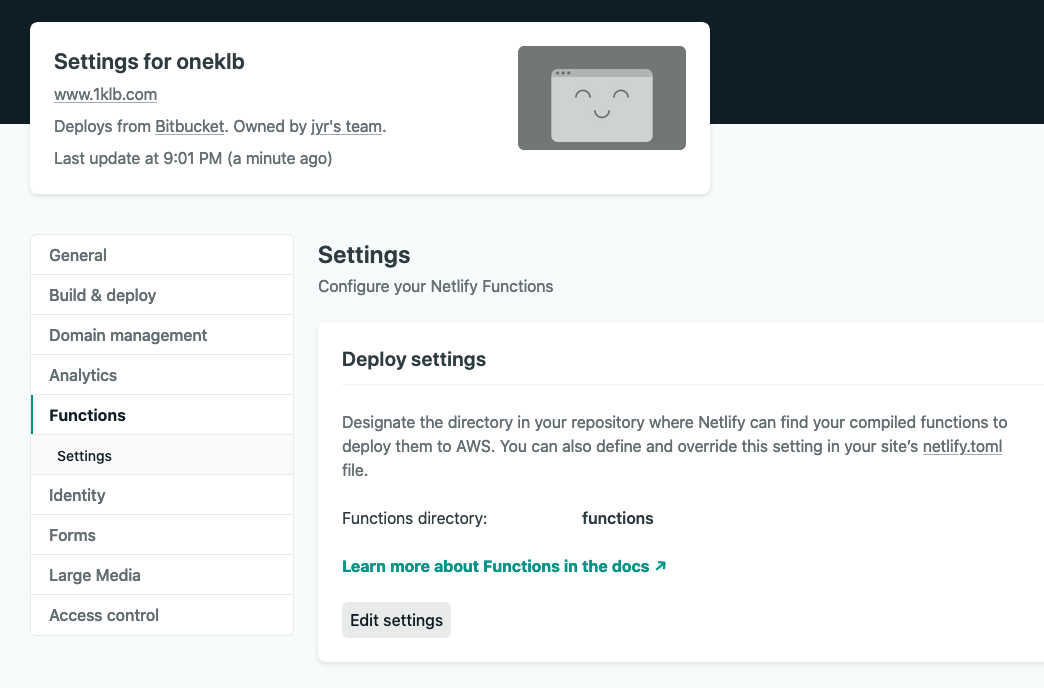
The other thing to note, is that Netlify will fire specific functions when specific things happen. For example, when a form is submitted, Netlify will look for, and run, the submission-created.js function (ie. the function stored in the file submission-created.js within the functions directory).
It took me a bit to get my head around functions. I ended up stealing a bunch of code from Netlify's examples to get this to work, but in the end, I succeeded. Here it the commenting code in its glory:
// Push comments from Netlify to FaunaDB. Fires on commment submission
// Based on:
// https://github.com/chrisjm/chrisjmears.com/blob/0361a03991b6a9ddd27d0514bc714b29a37908e2/js/spam-filter.js

// EXTERNAL LIBS
const https = require('https') // For POST requests

// CONSTANTS
let apiKey = "YOUR API KEY HERE"
// Or, if you have it set up through Netlify:
// let apiKey = process.env.FAUNA_KEY

let faunadbEndpoint = "https://graphql.fauna.com/graphql"

exports.handler = (event, context, callback) => {
  // 1. Parse the form
  try {
    var body = JSON.parse(event.body)
  } catch (e) {
    console.log(`Invalid JSON - ${e.message}`)
    callback(null, {
      statusCode: 400,
      body: `[ERROR] Invalid JSON - ${e.message}`
    })
  }

  let payloadData = body.payload.data

  // 2. Ensure it contains the relevant pieces
  if (!(payloadData.name && payloadData.comment && payloadData.post_slug)) {
    console.log(`ERROR - Required fields not defined.`)
    callback(null, {
      statusCode: 400,
      body: `[ERROR] - Required fields not defined`
    })
  }

  // 3. Push data to FaunaDB via graphQL

  let faunadbPayload = JSON.stringify({
    "query": `mutation{
      createComment(
        data: {
          submitter: "${payloadData.name}",
          post_slug: "${payloadData.post_slug}",
          body: "${payloadData.comment}"
        }
      )
      {submitter, post_slug, body}
    }`
  })

  let postOptions = {
    method: "POST",
    headers: {
      Authorization: `Bearer ${apiKey}`,
      'Content-Type': 'application/json',
      'Content-Length': faunadbPayload.length},
  }

  let req = https.request(
    faunadbEndpoint,
    postOptions,
    res => {
      if (res.statusCode == 200) {
        res.setEncoding('utf8')

        res.on('data', function (chunk) {
          let chunkData = JSON.parse(chunk)
          if (chunkData.errors) {

            console.log(`ERROR - ${JSON.stringify(chunkData.errors)}`)

            callback(null, {
              statusCode: 400,
              body: `[ERROR] ${JSON.stringify(chunkData.errors)}`
            })
          } else {
            callback(null, {
              statusCode: 200,
              body: `[SUCCESS]`
            })
          }
        })
      } else {

        res.setEncoding('utf8')

        res.on('data', function (chunk) {
          console.log(`ERROR - ${chunk}`)

          callback(null, {
            statusCode: 400,
            body: `[ERROR] ${chunk}`
          })
        })
      }
    }
  )

  req.write(faunadbPayload)

  req.end()
}
Note that your function isn't exposed to the public on Netlify, so it won't expose your API key. However, if you host your site's code on a public-facing repo, your API key will be visible. You can get around this with Netlify's environment variables, if you need to.
And that's it! We've closed the last loop. This means that whenever anyone submits a comment via the comment form, it'll trigger the javascript that inserts it into FaunaDB. That means it will, in turn, be drawn onto the blog when it renders.
Want to see what it looks like? It's operating on this blog now. Right below, you'll be able to see a sample comment.
Also, Fauna uses GraphQL, a technology I've never used before, which looks kind of cool. No better way to learn something than by trying to implement it on your own site, right? ↩︎